By: Jeremy Blye
Throughout my time editing pictures, I have found that many people have been interested in the photo editing process. I thought within this blog I would give some room to explain how exactly I have edited the headshots for the program and why it was done in this fashion.

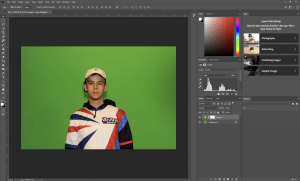
In this unedited picture, you can see that there is a stunning young lad. I wonder who he may be. With this picture, it may look good right off the bat. There are some key elements of the picture that I see that could be improved on. When it comes to my “philosophy” of editing, I tend to like to keep things as natural as possible. This is photography and not art. Before I get too off track, I’ll get into the editing process.
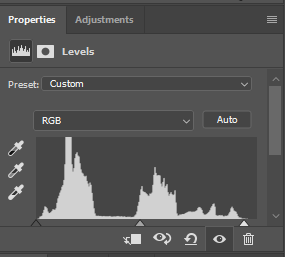
The first step is usually changing the levels of the picture. With this tool, you can manipulate the brightness of the pixels in the shadows, midtones, and highlights. The extremes of each end are the complete black pixels and the complete white pixels. Luckily in the histogram (graph of the pixels), you can see that the brightness of the picture is well balanced. I usually find that I just need to increase the brightness of the highlights and the white pixels. That is what I’m doing here.
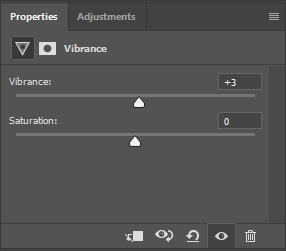
The next step is to add a little bit of saturation to the photo. It already looks decent, but adding in +3 to +6 in saturation helps the photo look just a little bit more alive once it is done editing.


After this, I like to change the vibrance a little bit. Adding in these little details that changes to photo very insignificantly help make the photo look that much better. Now that I have added in a small change to the vibrance, there are just a few more things that must be done.

Because this photo will be used for different media platforms, it is important to clean up any knicks on the face. I know, I know I said I like to keep the photo looking natural, but no one likes looking at any of the oil or acne on my face. It is a super quick edit that can be done with the spot-healing brush. Take a look:
Before:

After:
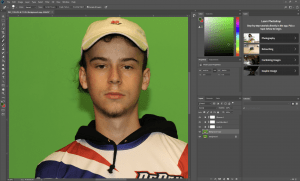
In order to get rid of some of the natural oils on my face, you can take the dodge and burn tool to darken the highlights on my face. Doing so helps the lighting look softer from the studio and the photo more crisp. In the end, the before and after photos have a decent difference and make it look that much better and more professional.

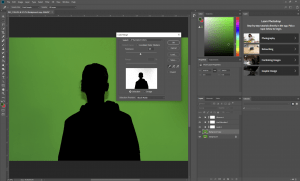
I bet you all thought it would be over from here. Funny thing, there is another step for the photos over here at DePaul. We need to cut out the bodies of each person and give them a transparent background. This allows us to use just the body of said person in any type of graphic with ease. It is also submitted into the league websites like EGF for their own use.
In order to cut people out, you can use 2 different tools. Today, I’ll be using the color range tool. This allows us to select a specific color. In this case, we are selecting the green in the background. From here, we can cut out the green in the background and have a transparent background. Finally, I will save the image as a .png and go from there.

Overall, I hope you were able to enjoy this little walkthrough into the madness that helped get the picture days done here at DePaul Esports. I figured I may as well walk some people through it since many have asked me exactly what I do when I have been editing. Hopefully you got to learn something from this, and I hope to see you all in the center!